I read the other day that we released a new version of the Kinect for Windows SDK that is supported by Windows 8. With as busy as I’ve been working on IE10, I’ve been a bit of a slacker when it comes to trying new things so I decided that it was time to dive in and take a quick peak at what I could do with Kinect.
In a matter of a few minutes, I managed to play around a bit with the depth image sensors and the color image sensors. I also mucked around a bit with the elevation and accelerometer data. I’m not going to get fancy with this post so hang onto your hat and follow along. If you’re the one random guy that stumbles on this post and actually reads it and has questions, feel free to ask. I mean, I won’t know how to answer it, but you can always ask!
Here goes.
Purchase
There isn’t much sense in doing anything if you haven’t purchased a Kinect for Windows device already. I am very specific in stating Kinect for Windows. While there are some folks out there that provide you with the ability to use your Kinect for Xbox 360, I wouldn’t recommend it. Go get yourself one of these devices and we’ll all wait patiently till you come back.
[tapping foot]
Download/Install/Setup
Download and Install the Kinect for Windows SDK. Make sure you get the latest one from October 8th, 2012.
Plug your device into your computer and make sure to plug the power into the device. Plug and play is your friend here as there is nothing to install to make the device available.
Start Coding
Setting up your Form
- Open up Visual Studio 2012
- Go to File | New Project
- In the dialog, select C# | Windows | Windows Forms Application (obviously you can do this in other languages, but I’m using C# here)
- Right-click the References tree node in Solution Explorer and select Add Reference
- Press Ctrl+E, type “Kinect“, check the “Microsoft.Kinect” assembly and click OK
- Add two PictureBox controls and a TrackBar control to Form1
- Set the TrackBar Maximum to 27 and the Minimum to -27. These are the range values for the camera elevation angle.
- Add a Timer control to the Form and set the interval to 1000ms (1 second)
- Double click Form1 to go to Code view
Coding
Add a couple of using statements at the top of the form:
using System.Drawing.Imaging;
using Microsoft.Kinect;
using System.Runtime.InteropServices;
Define a variable to reference the Kinect sensor inside the Form class. I also added some variables to hold my sensor data:
public partial class Form1 : Form
{
    KinectSensor sensor;

    // Depth sensor readings
    int depthStreamHeight = 0;
    int depthStreamWidth = 0;
    int depthStreamFramePixelDataLength = 0;

    // Color sensor readings
    int colorStreamHeight = 0;
    int colorStreamWidth = 0;
    int colorStreamFrameBytesPerPixel = 0;
    int colorStreamFramePixelDataLength = 0;
    ...
Set the reference to your sensor. We’ll be lazy here and just reference the first in the array. Then make sure to enable the depth stream and color stream. Here’s the code inside my form load handler:
private void Form1_Load(object sender, EventArgs e)
{
    sensor = KinectSensor.KinectSensors[0];
    sensor.DepthStream.Enable();
    sensor.ColorStream.Enable();
    sensor.DepthFrameReady += sensor_DepthFrameReady;
    sensor.ColorFrameReady += sensor_ColorFrameReady;
    sensor.Start();
}
You’ll notice that I also hooked up two event handlers here. These handlers fire when a frame is ready for rendering or otherwise processing. In our case, we’re just going to muck around with the data and dump it into the picture boxes. After we’ve set up our handlers, we go ahead and call start() on the sensor.
So now we need to create our handlers. In our handlers, we are going to:
- Attempt to open the frame
- Read the stream data for height, width, pixel length and bytes per pixel
- Convert the raw data to a bitmap
- Assign that bitmap to the picture control
Here’s my code for the sensor_DepthFrameReadyhandler:
private void sensor_DepthFrameReady(object sender,
    DepthImageFrameReadyEventArgs e)
{
    DepthImageFrame imageFrame = e.OpenDepthImageFrame();
    if (imageFrame != null)
    {
        depthStreamHeight = sensor.DepthStream.FrameHeight;
        depthStreamWidth = sensor.DepthStream.FrameWidth;
        depthStreamFramePixelDataLength =
            sensor.DepthStream.FramePixelDataLength;
        pictureBox2.Image = GetDepthImage(imageFrame);
    }
}
The GetDepthImage function is doing the conversion work for us. This is the code that does the conversion from the raw image frame data to a bitmap (btw, if you know an easier way to do this, please chime in. I’m not a graphics dev).
Bitmap GetDepthImage(DepthImageFrame frame)
{
    // create a buffer and copy the frame to it
    short[] pixels = new short[sensor.DepthStream.FramePixelDataLength];
    frame.CopyPixelDataTo(pixels);

    // create a bitmap as big as the stream data. Note the pixel format.
    Bitmap bmp = new Bitmap(depthStreamWidth, depthStreamHeight,
            PixelFormat.Format16bppRgb555
        );

    // Create a bitmap data, size appropriately, and lock the data
    BitmapData bmpdata = bmp.LockBits(
            new Rectangle(0, 0, depthStreamWidth, depthStreamHeight),
            ImageLockMode.WriteOnly,bmp.PixelFormat
        );
    // Wave your magic wand and unlock the bitmap
    IntPtr ptr = bmpdata.Scan0;
    Marshal.Copy(pixels, 0, ptr, depthStreamWidth * depthStreamHeight);
    bmp.UnlockBits(bmpdata);

    // return the bitmap
    return bmp;
}
It’s important to note the pixel format in this function because, when we create a similar function for the color frame, we will use a different format. You’ll want to make sure you use the right format depending on what data you are getting.
Here’s my code for the sensor_ColorFrameReady handler:
void sensor_ColorFrameReady(object sender, ColorImageFrameReadyEventArgs e)
{
    ColorImageFrame imageFrame = e.OpenColorImageFrame();
    if (imageFrame != null)
    {
        colorStreamHeight = sensor.ColorStream.FrameHeight;
        colorStreamWidth = sensor.ColorStream.FrameWidth;
        colorStreamFramePixelDataLength =
            sensor.ColorStream.FramePixelDataLength;
        colorStreamFrameBytesPerPixel =
            sensor.ColorStream.FrameBytesPerPixel;
        pictureBox1.Image = GetColorImage(imageFrame);
    }
}
Here’s the code for the GetColorImage function:
Bitmap GetColorImage(ColorImageFrame frame)
{
    // Create a buffer and stuff the frame pixels into it
    byte[] pixels = new byte[colorStreamFramePixelDataLength];
    frame.CopyPixelDataTo(pixels);

    // Create your bitmap. Notice the PixelFormat change!
    Bitmap bmp = new Bitmap(
            sensor.ColorStream.FrameWidth, colorStreamHeight,
            PixelFormat.Format32bppRgb
        );

    // Create a BitmapData objet and lock
    BitmapData bmpdata = bmp.LockBits(
            new Rectangle(0, 0, colorStreamWidth, colorStreamHeight),
            ImageLockMode.WriteOnly, bmp.PixelFormat
        );

    // Wave your magic wand again and copy the data. Notice this time
    // we multiply by the bytes per pixel? This is important to get the right
    // data size copied.
    IntPtr ptr = bmpdata.Scan0;
    Marshal.Copy(pixels, 0, ptr,
            colorStreamWidth * colorStreamHeight *
            colorStreamFrameBytesPerPixel
    );
    bmp.UnlockBits(bmpdata);

    // Return the bitmap
    return bmp;
}
All done well, you should now be able to run your application and get something like the following screen shot:
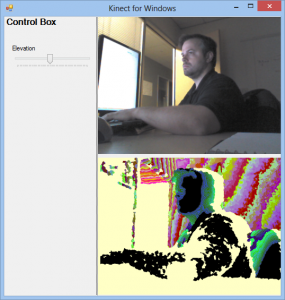
Kinect For Windows Sample – ScreenShot
Next, we want to add some control for the elevation of the Kinect. Of course, the Kinect does have limits so it can only move so far. In this post, we’ll just move the X component of control. We will use the TrackBar control that we added to the form at the beginning of this post.
First, a little caveat. We don’t want to move the elevation of the Kinect very often. In fact, the API documentation for Kinect tells us that it is very bad to move it often as you’ll wear out the controls. For that reason, we don’t want to move the Kinect on every event received from changing the TrackBar. That would cause problems. Instead, we will update a variable when the TrackBar is changed, and use a timer that fires every second (added earlier in the project) to do the actual validation of the data and updating of the elevation.
So, add the following declarations to your form:
"]public partial class Form1 : Form
{
KinectSensor sensor;
int lastElevation = 0;
int elevation = 0;
At the very bottom of your Form_Load event tell the timer to start:
timer1.Start();
Now, create an event handler for your trackBar’s ValueChanged event as follows:
private void trackBar1_ValueChanged(object sender, EventArgs e) {
    var value = trackBar1.Value;
    var reading = sensor.AccelerometerGetCurrentReading().X;
    if (value > (sensor.MaxElevationAngle + reading)) {
        value = sensor.MaxElevationAngle;
    }
    else if (value < (sensor.MinElevationAngle + reading)) {
        value = sensor.MinElevationAngle;
    }
    elevation = value;
}
What we are doing here is first reading what the current reading is on the Accelerometer’s X component. We do this because that can have an affect on how far the sensor can move. Next, we will do some validation to make sure that the elevation angle added to the reading isn’t greater or less than the maximum or minimum values allowed (currently 27 and -27 respectively). When we change the trackBar, it updates our elevation variable. Now we need to do something with that variable.
Create a Tick event handler for the timer control you added. Add the following code:
private void timer1_Tick(object sender, EventArgs e)
{
    if (lastElevation != elevation)
    {
        sensor.ElevationAngle = elevation;
        lastElevation = elevation;
    }
}
Again, we are just doing validation to see if the last elevation is different from the current elevation. If it isn’t, then we go ahead and move the sensor and update the current position.
All this should get you to a state where you can change the sensor elevation.
There’s a lot more fun to be had, but it took me longer to write this post than it did to write the code. I suspect you can take it from here faster than you could read my post. Happy coding!