Category Archives: Technical

These posts are technical in nature. The casual reader may not care about these posts. These are for my fellow geeks.

Azure Storage Client helpers

In my last post, I described how the configuration setting publisher worked. More specifically, I covered how to use the typical use-case of retrieving connection strings from Azure or local configuration and the typical errors you might produce when you use this incorrectly. I found myself writing the same code very often so I encapsulated this into a simple set of fluent-ish extensions (I say “ish” because by technical definition of fluent, these aren’t self-referencing… yet). That said, I thought I’d share this code as it helps me get my apps started pretty quickly.

// Author: Tobin Titus <tobin.titus@gmail.com>
// Copyright (c) 2010 Tobin Titus
//
// Licensed under the Apache License, Version 2.0 (the "License");
// you may not use this file except in compliance with the License.
// You may obtain a copy of the License at
//
//   http://www.apache.org/licenses/LICENSE-2.0
//
// Unless required by applicable law or agreed to in writing, software
// distributed under the License is distributed on an "AS IS" BASIS,
// WITHOUT WARRANTIES OR CONDITIONS OF ANY KIND, either express or implied.
// See the License for the specific language governing permissions and
// limitations under the License.

using Microsoft.WindowsAzure;
using Microsoft.WindowsAzure.StorageClient;
using Microsoft.WindowsAzure.ServiceRuntime;
using System.Configuration;

namespace AzureNinja.Storage
{
  public class Client
  {
    public const string DEFAULT_CONNECTION_STRING_NAME
          = "StorageConnectionString";
    static Client()
    {
       CloudStorageAccount.SetConfigurationSettingPublisher(
          (configName, configSettingPublisher) =>
          {
              var connectionString = RoleEnvironment.IsAvailable
                 ? RoleEnvironment.GetConfigurationSettingValue(configName)
                 : ConfigurationManager.AppSettings[configName];
               configSettingPublisher(connectionString);
          });
    }

    public static CloudStorageAccount FromConfig(
       string configSetting = DEFAULT_CONNECTION_STRING_NAME)
    {
        return CloudStorageAccount.FromConfigurationSetting(configSetting);
    }

    public static CloudStorageAccount FromString(string connectionString)
    {
       return CloudStorageAccount.Parse(connectionString);
    }
  }

  public static class CloudStorageClientHelpers
  {
    public static CloudBlobClient ForBlobs(this CloudStorageAccount account)
    {
       return account.CreateCloudBlobClient();
    }
    public static CloudQueueClient ForQueues(this CloudStorageAccount account)
    {
        return account.CreateCloudQueueClient();
    }
    public static CloudTableClient ForTables(this CloudStorageAccount account)
    {
        return account.CreateCloudTableClient();
    }
  }
}

You can then construct your requests for a CloudXxxClient as follows:

CloudBlobClient  client1 = Client.FromConfig().ForBlobs();
CloudQueueClient client2 = Client.FromConfig().ForQueues();
CloudTableClient client3 = Client.FromConfig().ForTables();

This uses “StorageConnectionString” as the default configuration key. And you can specify configuration key as well:

Client.FromConfig(“myConfigKey”).ForBlobs();

Furthermore, this allows you to concentrate on your calls to an otherwise fluent Azure API:

Client.FromConfig().ForBlobs().GetContainerReference(“myContainer”).Delete();

or

Client.FromConfig().ForBlobs()
     .GetContainerReference("myContainer").CreateIfNotExist();

Let me know if you have any questions or input.

CloudStorageAccount.SetConfigurationSettingPublisher

Those venturing into Windows Azure development for the first time may find themselves in a bit of a quandary when they try to devise a strategy for getting their storage account credentials. You dive into the Windows Azure APIs and determine that you must first get a reference to a CloudStorageAccount. You are all aglow when you find the “FromConfigurationSetting” method that takes a single string parameter named “settingName”. You assume that you can store your connection information in a configuration file, and call “FromConfigurationSetting” from your code to get dynamically load the connection information from the config file. However, like most of the Windows Azure documentation, it is very light on details and very heavy on profundity. The documentation for “FromConfigurationSetting” currently says:

Create a new instance of a CloudStorageAccount from a configuration setting.

That’s almost as helpful as “The Color property changes the color.” Notice that it isn’t specific about what configuration setting this comes from? The documentation is purposefully generic, but falls short of explaining why. So I’ve seen multiple questions in forums and blogs trying to figure out how this works. I’ve seen developers try to put the configuration setting in various places and make assumptions that simply providing the configuration path would get the desired result. Then they try to run the code and they get the following exception message:

InvalidOperationException was caught

SetConfigurationSettingPublisher needs to be called before FromConfigurationSetting can be used

Of course, this causes you to look up “SetConfigurationSettingPublisher” which also is a little light on details. It says:

Sets the global configuration setting publisher.

Which isn’t entirely clear. The remarks do add some details which are helpful, but don’t go as far as to help you understand what needs to be done – hence this blog post. So that was the long setup to a short answer.

The FromConfigurationSetting method makes no assumptions about where you are going to store your connection information. SetConfigurationSettingPublisher is your opportunity to determine how to acquire your Windows Azure connection information and from what source. The FromConfigurationSetting method executes the delegate passed to SetConfigurationSettingPublisher – which is why the error message says this method needs to be called first. The delegate that you configure should contain the logic specific to your application to retrieve the storage credentials. So essentially this is what happens:

  1. You call SetConfigurationSettingPublisher, passing in the logic to get connection string data from your custom source.
  2. You call FromConfigurationSetting, passing in a setting name that your delegate can use to differentiate from other configuration values.
  3. FromConfigurationSetting executes your delegate and sets up your environment to allow you to create valid CloudStorageAccount instances.

So, going back to a typical application, you want to store your configuration in a .config file and retrieve it at runtime when your Azure application runs. Here’s how you’d set that up. When your application starts up, you’ll want to configure your delegate using SetConfigurationSettingPublisher as follows:

CloudStorageAccount.SetConfigurationSettingPublisher(
  (configName, configSettingPublisher) =>
 {
    var connectionString = RoleEnvironment
         .GetConfigurationSettingValue(configName);
    configSettingPublisher(connectionString);
 }
);

If this is an ASP.NET application, you could call this in your Application_Start event in your global.asax.cs file. If this is a desktop application, you can set this in a static Constructor for your class or in your application startup code.

In this example, you are getting a configuration string the Windows Azure configuration file, and using the delegate to assign that string to the configuration setting publisher. This is great if you are executing in Windows Azure context all the time. But if you aren’t running your code in the Windows Azure context  (for instance, you are exercising your API from NUnit tests locally) this example will throw another exception:

SEHException was caught

External component has thrown an exception.

To solve this problem, you can set up the delegate to handle as many different environments as you wish. For example, the following code would handle two cases – inside a Windows Azure role instance, and in a local executable:

CloudStorageAccount.SetConfigurationSettingPublisher(
  (configName, configSettingPublisher) =>
  {
      var connectionString = RoleEnvironment.IsAvailable
          ? RoleEnvironment.GetConfigurationSettingValue(configName)
          : ConfigurationManager.AppSettings[configName];
      var connectionString = RoleEnvironment
          .GetConfigurationSettingValue(configName);
      configSettingPublisher(connectionString);
});

For your unit tests to work, just add an appSettings key to your configuration file:

<configuration>
 <appSettings>
  <add key="DataConnectionString"
    value="DefaultEndpointsProtocol=http;
              AccountName=<accountName>;AccountKey=<accountKey>;"/>
 </appSettings>
</configuration>

Note: Make sure to replace <accountName> and <accountKey> with your custom values.

In the context of your Windows Azure application, just make sure that you configure the same configuration key name there. In Visual Studio:

  1. Right click your Windows Azure role and choose Properties from the dropdown menu.
  2. Click on the Settings tab on the left.
  3. Click the Add Setting button in the button bar for the Settings tab.
  4. Type “DataConnectionString” in the Name column
  5. Change the Type drop down box to Connection String
  6. Click the “” (ellipsis) button in the right hand side of the Value column
  7. Configure your storage credentials using the values from the Windows Azure portal
  8. Click OK to the dialog
  9. Use the File | Save menu option to save your settings then close the settings tab in visual studio.

With this code, you should now be able to retrieve your connection string from configuration settings in a Windows Azure role and in a local application and retrieve a valid CloudStorageAccount instance using the following code:

var account = CloudStorageAccount
                   .FromConfigurationSetting("DataConnectionString");

Of course, you aren’t limited to these scenarios alone. Your SetConfigurationSettingPublisher delegate may retrieve your storage credentials from anywhere you choose – a database, a user prompt, etc. The choice is yours.

For those of you who need a quick and dirty way to get an CloudStorageAccount instance without all the hoops, you can simply pass your connection string in to the Parse or TryParse method.

var account = CloudStorageAccount.Parse(
   "DefaultEndpointsProtocol=http;" + 
   "AccountName=<accountName>;" + 
   "AccountKey=<accountKey>");

This should give you all the information you need to get a CloudStorageAccount instance and start accessing your Windows Azure storage.

Hacking Polar Watch WebSync Software

I recently purchased a Polar FT-40 watch to monitor my fitness level and track my workouts better. I like the watch so far although I’m not ready to give a thorough review on it just yet. Today, I received the Polar FlowLink data transfer unit that allows me to transfer the data on my watch to Polar’s website. It allows you to chart your progress and do all sorts of interesting things with the data. I was surprised how easy and smoothly the software worked. However, I wanted the data on my desktop so I could do more with it. I wanted to provide my own charts and data views in Excel. I wanted to be able to post it to my blog easily or write a WordPress widget to display my data. That said, I decided to look at what the WebSync software was written in. I had a sneaking suspicion that it might be .NET — I was right!

So, I decided to look under the hood and see if I could tackle writing my own front end to their devices. What I found should horrify anyone who has ever read past Chapter 1 of a reasonable “C#” book.

I started by pulling in the obvious assemblies to see what was built. The project looked reasonably well built. There was enough evidence ot see that there was at least SOME design put into the application. I even found some tests in tone assembly — at least there were some tests (checked that off on their requirements eh?). When I took a look at the EXE, however, what I saw shocked me. So I started drilling down into WebSync.exe. I found a Polar.WebSync.Program class with a static Main() method. Bingo – my entry point. I immediately saw some minor concerns. For instance, they were using a Mutex to provide the functionality of a Singleton pattern. Worse yet, they were calling GC.KeepAlive() on the Mutex. Interesting. They did, however, have what looked like an external exception reporting framework, so that at least gave me SOME hope.

I found Application.Run that was starting a new WebSyncTrayForm() so I naturally followed to the form constructor. In a big Try/Catch block (with no code executing in the “catch” portion), I found a TextBox-style TraceListener was added to the form — mmkay. That’s a decent idea I suppose, but let’s look at the form’s Load event. Oh my! I closed my eyes and looked again. I closed then and then looked one more time. Oh, these folks must have written some VB code with “DoEvents” called more than a few times in their past history. Tell me what you see wrong with this:

WARNING: Not good example code!!

private void WebSyncTrayForm_Load(object sender, EventArgs e)
{
    base.Visible = false;
    this.notifyIcon.Tag = this.notifyIcon.Icon;
    this.toolTip = this.notifyIcon.Text;
    this.notifyIcon.Text = this.toolTip + "n" +
        Resources.StatusInitializing;
    this.timerDaemon = new Timer();
    this.timerDaemon.Interval = 0x2710;
    this.timerDaemon.Tick += new EventHandler(this.timerDaemon_Tick);
    this.timerDaemon.Start();
    this.timerDaemon_Tick(this.timerDaemon, EventArgs.Empty);
}

Seriously? These guys set up a timer, and then start it, and then MANUALLY call the Tick function they just set up! (how do they know it hasn’t been executed already between the start call and a thread interuption that might have caused the Tick event to get executed next.

Then I looked at the tick event and I couldn’t believe what I was seeing.

WARNING: Not good example code!!

private void timerDaemon_Tick(object sender, EventArgs e)
{
    this.retryCount++;
    try
    {
        if (this.retryCount == 6)
        {
            this.timerDaemon.Interval = 0xea60;
        }
        this.mounter = new WristUnitListener();
        this.mounter.WristUnitMounted +=
                new WristUnitConnectionEventHandler(this.WristUnitMounted);
        this.mounter.WristUnitUnmounted +=
                new WristUnitConnectionEventHandler(this.WristUnitUnmounted);
        this.mounter.Start();
        this.DoInitialConfig(null);
        this.timerDaemon.Stop();
        this.timerDaemon.Dispose();
        this.timerDaemon = null;
        this.notifyIcon.Icon = this.notifyIcon.Tag as Icon;
        this.notifyIcon.Text = this.toolTip + "n"
                + Resources.StatusRunning;
        Trace.WriteLine("Connected to Polar Daemon.", "WebSync");
    }
    catch (ConnectionException exception)
    {
        if (this.retryCount < 6)
        {
            Trace.WriteLine(
               string.Format("Couldn't connect to Polar Daemon ({0})",
                              exception.CodeString),
                             "WebSync");
        }
        if (this.retryCount == 6)
        {
            Trace.WriteLine(
               string.Format("Couldn't connect to Polar Daemon ({0})",
                             exception.CodeString),
                             "WebSync");
            Trace.WriteLine(
               string.Format("WebSync couldn't initialize properly." +
                             "Please check that Polar Daemon service is running.",
                              new object[0]), "WebSync");
            this.notifyIcon.Icon = Resources.IconExclamation;
            this.notifyIcon.Text = this.toolTip + "n" + Resources.StatusInitError;
            this.notifyIcon.ShowBalloonTip(0x2710, Resources.ToolTipProblemTitle,
                              Resources.ToolTipInitError, ToolTipIcon.Warning);
            this.notifyIcon.BalloonTipClicked +=
                new EventHandler(this.notifyIcon_BalloonTipClicked);
        }
    }
}

OK. These guys are on crack! They have a retry counter that apparently will never be more than 1. Because the tick event will go away and there is no loop in this code, the retryCount will always be 1 (taking note that they decided to start with a 1-based counting system rather than zero because n-1 is a bit complex). That at didn’t stop them from checking to see if it was equal to 6, and if so, changing the interval.

In the tick event, they create a new instance of a WristUnitListener and hook up events to it EACH time. They call start on the WristUnitListener instance and then STOP the timer and dispose of it! Never mind the fact that this timer execution is owned by the main thread rather than the timer tick function — when a timer stops itself, disposes of itself, and then nulls itself, it’s time to reevaluate your understanding of background-thread polling. This is insane! I have no idea how this even works. I can only hope that, as I dig in further WristUnitListener actually works the way it is supposed to and the only thing that sucks is the WebForms code.

Update January 13th, 2010 1:15AM PST:

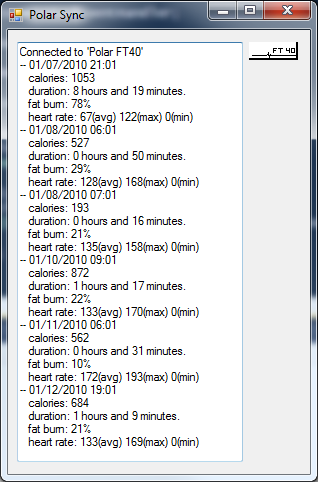
I was able to successfully hack around with the API and get data off the watch with little effort. The trick was to working around some wonky and non-working APIs. To their defense 1) this API and software has to work with multiple watches 2) wasn’t intended to be consumed by other devs 3) was written with interop for the native libraries accessing the hardware, 4) does show signs of some intelligent thinking (although does need considerable amounts of re-work). As you can see by the image, I can even pull the bitmap logo off of the watch and, if I so desire, set it.

This is far from complete but I will work it over some this week and this weekend before publishing the source on Codeplex. Let me know if there is something in particular that you’d like to see.


Update July 7th, 2010 12:01AM PST:

I have posted this code to codeplex as-is. You can find it here: http://polarsync.codeplex.com/

If you would like to contribute source code or improve the project for others in the community, please send me a request and I’ll approve you. I don’t intend to maintain the code or improve it.

Poll: Where would you categorize SQL Azure?

I own the sites for all of the data stack on MSDN. I’m trying to categorize the SQL Azure technology where it makes the most sense to put it. I can obviously categorize this under SQL Server (as it currently sits), or I can move it to the Azure development center. Obviously I can link to it from either place, but I’m trying to decide where it belongs in the overall scheme of things. Your thoughts are appreciated. Vote, comment, do whatever you want, but please speak up and retweet this (link above) so others can too!

[poll id=”3″]

Thanks for your assistance!

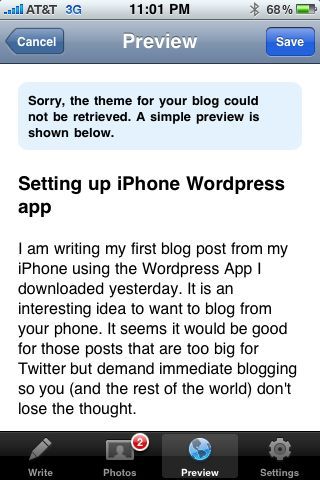
Setting up iPhone WordPress app

I am writing my first blog post from my iPhone using the WordPress App I downloaded yesterday. It is an interesting idea to want to blog from your phone. It seems it would be good for those posts that are too big for Twitter but demand immediate blogging so you (and the rest of the world) don’t lose the thought.

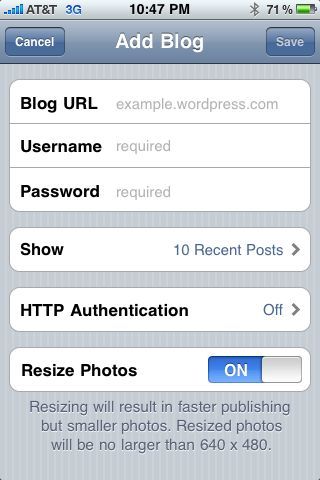
I downloaded this app with low expectations. I expected to be able to view some basic settings and do some basic management from the app with an occasional blog post to boot. This appdoes all of this rather flawlessly– that is, flawlessly after you manage to get it set up properly. When I set up the WordPress app, I used “http://” in the URL field for the setup wizard. This allowed me to log in but then gave me errors after that when retrieving data. I removed the prefix an all was well.

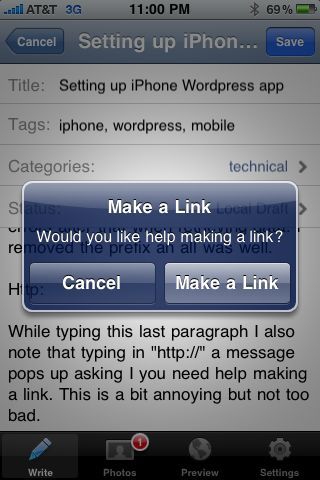
While typing this last paragraph I also note that typing in “http://” a message pops up asking I you need help making a link. This is a bit annoying but not too bad.

This app ha a lot of potential. The fact that it is free prevents me from providing too much in the way of criticism. I’m happy to have found the app — an to have found it suitable for my needs. You can find it at http://iphone.wordpress.org.

UPDATE: Now that the post was completed, I decided to come back here and update the site with a few missing details that I’d like to see added.

Photos:
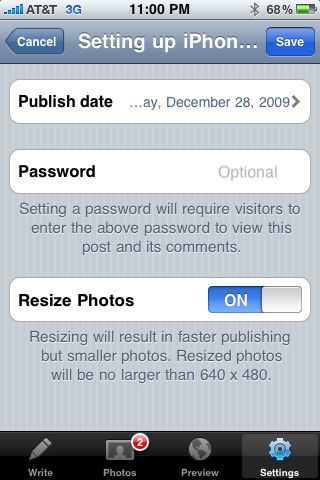
When I blogged this, I was able to add photographs of the app to the post, but I wasn’t able to insert them where I wanted. This was a bit of a disappointment.

HTML only:
Blogging in the WordPress app requires that you code every bit of HTML out with the exception of a few helper methods such as adding links, etc. I would like to see more helpers added that allow me to pick photos that I’ve already uploaded.

Voice Blogging:
It only seems natural that if you are using an iPhone, you might want to incorporate voice dictation. It would be nice to have the clarity of voice-to-text that Dragon Dictation has but without having to switch apps — particularly if you have helper methods. Imagine blogging by simply speaking. When you say “atch tee tee pee” the app nows to pop up the link helper. WHen you say “image source” it knows to pop up the picture selection dialog.  You could blog so quickly using your iPhone if a little effort went into this feature.

That’s all I have for now.

Indexers as Extension Methods?

So I’ve had this nagging issue for a little while. It’s not necessarily a huge issue because I have a workaround, but that said, it still nags at me now and again. That issue is that I cannot create an indexer as an extension method. This isn’t possible for a number of reasons that make sense, but I thought I’d blog about it anyway and solicit thoughts on the idea.

First, let’s talk about what we can do. I can create an extension method for any existing class. Let’s say I have the following class already created:

public class SomeClass{
   public int SomeProperty { get; set; }
}


I can then extend a List of SomeClass pretty easily like this:

public static class Extensions{
   public static string SomeListExtensionProperty(this List<SomeClass> classes)   {
      //… provide implementation here …
   }
}


Notice that I’ve scoped my extension to only extend a generic List of SomeClass. For instance I can do this:

var sc = new List<SomeClass>();string s = sc.SomeListExtensionProperty();


but I cannot do this:

var soc = new List<SomeOtherClass>();
string s = soc.SomeListExtensionProperty();


So what would happen if I tried to extend the List of SomeClass with an indexer like this:

public static string this[int index](this List<SomeClass> classes){
 return classes[i].SomeProperty;
}


We wouldn’t get past compilation. First of all, the word “this” and “static” don’t mix or tend to make sense together in most cases. That is because “this” refers to an instance of a class while “static” refers to type itself. In general, mixing these two wouldn’t make sense. That said, we already mix these two keywords when we create extension methods. So that isn’t the only reason this wouldn’t work. The next reason is that the generic List class already provides an indexer. Since you can’t override existing members with extensions, you are left without the ability to create an indexer with an extension.

Our only recourse would be to provide extension methods that provide the same functionality as a method.

public static string GetSomeProperty(this List<SomeClass> classes, int index){
   return classes[index].SomeProperty;
}


We can then call something like this:

var sc = new List<SomeClass>();
string s = sc.GetSomeProperty(index);


This isn’t quite as abbreviated as an indexer and in fact doesn’t save me anything over what I would get with the out-of-the-box generic List indexer:

var sc = new List<SomeClass>();
string s = sc[index].SomeProperty;


That said, the “nagging issue” is more of a request for a solution looking for a problem. Obviously indexers are great shorthand that ‘can’ provide a ‘default property’ so-to-speak. However, it is very easy to get what you want without much work.

Hacking jQuery Slider into WordPress Theme

I have just finished converting most (all?) of my posts from various blogs around the intertubes into WordPress. My previous blog on this domain was running Oxite. I created a theme called ‘Titus’ (yeah, I know) for Oxite that included a little jQuery ‘Slider’ plugin that I wrote. The control shows my last ‘n’ number of twitter posts, one at a time in a rotating fashion. I named it slider because I originally intended for the content to ‘slide’ up from the bottom continuously. Instead, I decided to fade them in/out. I was too lazy to rename it after I decided on my desired effect. After moving to wordpress, I was slightly upset that I was losing my hard work. However, this was a jQuery plugin so I didn’t see why this couldn’t just plug into my WordPress theme. I’m NOT a PHP developer, nor do I pretend to know how to do anything in WordPress. That said, I forged forward in my attempt to get this plugin working. You should see this plugin working right now on this site (unless you are reading this through RSS).

First let’s define the content of my plugin. I have a Javascript file containing my plugin, a CSS file containing the styling I’m using on the site, a little HTML markup to add my ‘placeholder’ for twitter feed, and of course the dependency on jQuery.

Installing jQuery into your Theme

First let’s tackle the jQuery item.  A current version of the WordPress distribution includes jQuery. The trick is to include jQuery in your site. After a little investigation I found that jQuery was already ‘registered’ in WordPress code, but does not, by default, render to the browser.  Somewhere in /wp-includes/script-loader.php you’ll find:

$scripts->add( 'jquery', '/wp-includes/js/jquery/jquery.js', false, '1.3.2');

This line registers the script we want in a dictionary with the key ‘jquery’. After digging further, I found a funcation called ‘wp_enqueue_script’ in /wp-includes/functions.wp-scripts.php.

/**
 * Enqueues script.
 *
 * Registers the script if src provided (does NOT overwrite) and enqueues.
 *
 * @since r16
 * @see WP_Script::add(), WP_Script::enqueue()
*/
function wp_enqueue_script( $handle, $src = false,
                            $deps = array(),
                            $ver = false,
                            $in_footer = false ) {
   global $wp_scripts;
   if ( !is_a($wp_scripts, 'WP_Scripts') )
      $wp_scripts = new WP_Scripts();
   if ( $src ) {
      $_handle = explode('?', $handle);
      $wp_scripts->add( $_handle[0], $src, $deps, $ver );
      if ( $in_footer )
         $wp_scripts->add_data( $_handle[0], 'group', 1 );
   }
   $wp_scripts->enqueue( $handle );
}

I put two-and-two together and with a little trial and error, I added the following line to /wp-content/themes/inove/header.php right before the call to wp_head():

<?php wp_enqueue_script('jquery'); ?>

This method gets the script location from the dictionary and renders a script tag with the location details.

Installing the slider jQuery Plugin

If the core did not register our script in the dictionary, we can provide the location details ourself with a second parameter. That is precisely what I needed to do to get the slider.js file added to the template. I added the following line just after the previous line I added in header.php.

<?php wp_enqueue_script('slider',
                      (get_bloginfo('template_url') . '/js/slider.js') ); ?>

The contents of this file are:

function($) {
   $.fn.twitterClient = $.fn.twitterClient = function(params) {
      var t = $.extend({}, $.fn.twitterClient.defaults, params);
      $(this).append('<ul id="twitter_update_list"><li></li></ul>');
      $.getScript("http://twitter.com/javascripts/blogger.js");
      $.getScript("http://twitter.com/statuses/user_timeline/"
                   + t.userName
                   + ".json?callback=twitterCallback2&count="
                   + t.tweetCount,
                   function() {
                      var list = $("ul#twitter_update_list");
                      stopTick(list);
                      list.items = $("li", list);
                      list.items.not(":eq(0)").hide().end();
                      list.currentitem = 0;
                      startTick(list);
                  }
      );
      startTick = function(list) {
         list.tick = setInterval(
            function() { tickFunction(list) },
            (t.delaySeconds * 1000)
         )};
      stopTick = function(list) {
         clearInterval(list.tick);
         };
      tickFunction = function(list) {
         if (list.pause) return;
         list.pause = true;
         $(list.items[list.currentitem]).fadeOut("slow",
            function() {
               $(this).hide();
               list.currentitem = ++list.currentitem % (list.items.size());
               $(list.items[list.currentitem]).fadeIn( "slow",
                  function() {
                     list.pause = false;
                  });
        });
     };
     this.each( function() {
                 if (this.nodeName.toLowerCase() != "ul") return;
                }).addClass(t.cssClass)
             return $("ul#twitter_update_list");
     };
     $.fn.twitterClient.defaults = {
         userName: null,
         tweetCount: 10,
         delaySeconds: 5,
         cssClass: "twitterClient"
     };
})(jQuery);

Next, I needed to add my styles for the twitter stream into my template. A method intuitively similar to that for scripts was found called ‘wp_enqueue_style’ that allowed me to register my CSS for rendering:

<?php wp_enqueue_style('slider',
                     (get_bloginfo('template_url') . '/js/slider.css') ); ?>

The contents of this file were:

/*ID:   slider  Elements: slider UL, slider LI, slider LI A */
#slider {
      position: relative; top: 5px;  width: 470px;  color: #bbbbbb;
}
#slider ul, #slider li{
   margin:0;  padding:0;  list-style:none;
}
#slider li {
   width:470px;  height:70px;  overflow:hidden;
}
#slider li a {
   text-decoration: none;
}

I saved the header file and closed it.

Add the jQuery plug-in Placeholder

All of our infrastructure is in place. Now I need to add a placeholder, and tell jQuery to call my plugin against the placeholder. Luckily, this style already has the ability to add content to the header region of the template. I simply went into WordPress addmen, and went to “Current Theme Options” under ‘Appearance’ and added the following to the “Banner” section:

<!-- Slider -->
 <div id="slider"><div id="twitterClient"></div></div>
 <script type="text/javascript">
  jQuery(document).ready(function($) {
    $("#twitterClient").twitterClient({
                        userName: "tobint",
                        tweetCount: 10,
                        delaySeconds: 5
                        });
    });
 </script>
<!-- /Slider -->

I also checked the boxes above to display this content for registered users, commenters, and visitors. I saved the file header options and viewed my site. Much to my glee, everything worked just great. My next steps are to turn this into a widget so others can just add this to any registered sidebar for a given theme.

Let me know if you have any questions.

Experiencing Orchard

A new post has been added to Learning in Public:

Off-topic: Experiencing Orchard