2017 – The Year of Motivation

In 1993, I wrote out my first business plan for a college class. I called my idea “TeleCom Television”. I drew out plans for things that didn’t exist yet: Netflix-style movies and television on demand, Amazon-style shopping, and Encyclopedia-style information at your fingertips — all accessed by Echo-style voice control to your television. I didn’t follow through on that idea at all because I thought people smarter and better than me had to build them. Back then, not only did these services not exist, we didn’t even have the infrastructure close to what was needed to support these ideas. Today, we have all of the infrastructure and these we have all of these ideas implemented — built by other people. I get to work on building a browser and influencing the internet standards that make all of this possible, but I by no means was a chief player in implementing any of my ideas.

In 2005, I had an idea for a real-time data service for traveling smarter: avoiding cops, road closures, traffic accidents, and other dangers by allowing users to provide the data real-time. In 2006 I let someone talk me out of it. In 2013, a service just as I described called Waze sold to Google for a cool $1.3 billion. I use it everyday knowing it’s pretty much exactly what I envisioned but I don’t collect a dime.

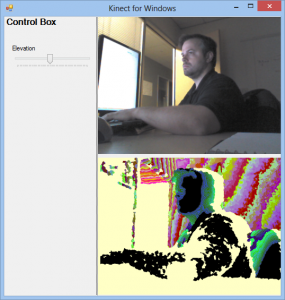
In 2006, my friends Erik Porter, Ernie Booth, and I penned a large paper together on the future of Neal Stephenson-style Virtual/Augmented reality. I thought this required a Microsoft-sized company to build a vision this large. Through Microsoft, we filed a bunch of patents together and set things in motion at Microsoft that have apparently turned out pretty well with Microsoft Kinect, XBOX LIVE Avatar Gear, Project Spark, Microsoft HoloLens and more. Microsoft is benefiting (Kinect opened as the fastest selling electronic device in history) but Erik, Ernie, and I don’t own that vision and our compensation for our ideas was mediocre at best. Worst of all, some other guy gets to own and drive that vision.

I could go on, but I won’t.

I’ve had big ideas in my life. Many of you have similar stories and I’m sure lots of regret from not following up. I’ve had enough with not following my ideas or dreams. I’ve had enough with watching others own the vision for an idea I know I could drive better. I’m tired of watching others get rich on these ideas when I could have a large piece of the pie. So in 2017, I am driving myself to higher motivation. That doesn’t mean I won’t implement and invent new ideas for my company. I’m just going to make sure that I’m in the driver seat of my own vision for where I want to be at this time next year. I’m not going to sit back and be quiet while others implement what I’ve been dreaming of for years.

My goals for the year:

  1. Automate as much of my daily life as I possibly can. I want my life on auto-pilot so that I can stay in a routine. That may sound rigid, but the truth is, the more automated your life is, the more flexibility you have. This counter-intuitive principle happens because you now have more free-time to spend on what you want and less stress worrying about the things that shouldn’t cause anyone stress.
  2. Make my job about creating. Creation for me is self-delighting so I want to do more of this. Many people say “I’m going to spend my spare time doing the things I like.” and call that “Work/Life balance.” I’m going to stop trying to “balance” work and life to allow me to work on those passions “in my spare time”. I’m going to make my job more creative and accomplishment-focused. That means I’m going to work on my passions at my job in a way that means when I’m going home, I still get to work on my passions, and that still accumulates to my job. I used to have this and I will have this again.
  3. Learn from everything/everyone. Learning isn’t just about reading. It’s about putting things into practice. In order to do this you have to stop talking and start listening to others carefully (1-on-1, books, articles, videos, etc) You have to also be able to teach others that topic and you can’t really do that until you’ve done it a good bit yourself. If you catch me being very quiet in a room, it’s not because I’m not interested. It’s because I want to learn what you know and I want to be able to do something practical with that knowledge.
  4. Iterate constantly and take value early. People that know me know that I tend to focus on putting the full picture together before I unveil. This comes from my “art” days when I didn’t want anyone to look at what I was drawing, painting, etc until I was done. You’ll see me cleaning things up to “ship” frequently and iterating more. The reason? I want to take the value early and use that value to build the next thing or second half of a project more quickly.

That’s all I got for today. I think that’s a lot considering I also haven’t blogged publicly in over a year and 4 months. 🙂

Fiddler Script for Accept-Language Testing

It’s been a while since I’ve blogged about anything so it’s only fitting that I post about doing something fairly trivial. I say it’s trivial because Fiddler makes my job so gosh-darn easy!

I often find myself testing that web sites work in various other languages. In many cases, changing the Accept-Language for a site will do the trick and luckily Fiddler’s custom rules will let you do the trick. The software allows you to specify Japanese as an option under the Rules menu.

That said, simply testing one language isn’t usually enough. I’d find myself hitting CTRL+R to open the CustomRules.js file, editing the Accept-Language and waiting for another day before I’d need to do this again.

I got tired of this today and completely removed the single-instance Japanese support option from Fiddler. So I replaced this code:

    // Cause Fiddler to override the Accept-Language header 
    public static RulesOption("Request &Japanese Content")
    var m_Japanese: boolean = false;

With this code:

    // Cause Fiddler to override the User-Agent header with one of the defined values
    RulesString("&Accept-Languages", true) 
    BindPref("fiddlerscript.ephemeral.AcceptLanguage")
    RulesStringValue(0,"None", "")
    RulesStringValue(1,"German", "de")
    RulesStringValue(2,"English", "en")
    RulesStringValue(3,"Spanish", "es")
    RulesStringValue(4,"French", "fr")
    RulesStringValue(5,"Italian", "it")
    RulesStringValue(6,"Japanese", "ja")
    RulesStringValue(7,"Korean", "ko")
    RulesStringValue(8,"Dutch ", "nl")
    RulesStringValue(9,"Polish", "pl")
    RulesStringValue(10,"Portuguese (Brazil)", "pt-br")
    RulesStringValue(11,"Russian", "ru")
    RulesStringValue(12,"Swedish ", "sv")
    RulesStringValue(13,"Chinese (PRC)", "zh-cn")
    RulesStringValue(14,"Chinese (Taiwan)", "zh-tw")
    RulesStringValue(15,"en-us, fr-fr", "en-us, fr-fr")
    RulesStringValue(16,"ru-mo, de-at, zh-tw, fr", "ru-mo;q=1,de-at;q=0.9,zh-tw;q=0.8,fr;q=0.6")
    RulesStringValue(17,"&Custom...", "%CUSTOM%")
    public static var sAL: String = null;

And later in the file, I replaced this code:

if (m_Japanese) {
    oSession.oRequest["Accept-Language"] = "ja";
}

with this code:

// Accept-Language Overrides
if (null != sAL) {
    oSession.oRequest["Accept-Language"] = sAL; 
}

Now every time I open Fiddler, I can just select the language I want to use.

Fiddler-Accept-Language

Kinect for Windows SDK

I read the other day that we released a new version of the Kinect for Windows SDK that is supported by Windows 8. With as busy as I’ve been working on IE10, I’ve been a bit of a slacker when it comes to trying new things so I decided that it was time to dive in and take a quick peak at what I could do with Kinect.

In a matter of a few minutes, I managed to play around a bit with the depth image sensors and the color image sensors. I also mucked around a bit with the elevation and accelerometer data. I’m not going to get fancy with this post so hang onto your hat and follow along. If you’re the one random guy that stumbles on this post and actually reads it and has questions, feel free to ask. I mean, I won’t know how to answer it, but you can always ask!

Here goes.

Purchase

There isn’t much sense in doing anything if you haven’t purchased a Kinect for Windows device already. I am very specific in stating Kinect for Windows. While there are some folks out there that provide you with the ability to use your Kinect for Xbox 360, I wouldn’t recommend it. Go get yourself one of these devices and we’ll all wait patiently till you come back.

[tapping foot]

Download/Install/Setup

Download and Install the Kinect for Windows SDK. Make sure you get the latest one from October 8th, 2012.

Plug your device into your computer and make sure to plug the power into the device. Plug and play is your friend here as there is nothing to install to make the device available.

Start Coding

Setting up your Form

  1. Open up Visual Studio 2012
  2. Go to File | New Project
  3. In the dialog, select C# | Windows | Windows Forms Application (obviously you can do this in other languages, but I’m using C# here)
  4. Right-click the References tree node in Solution Explorer and select Add Reference
  5. Press Ctrl+E, type “Kinect“, check the “Microsoft.Kinect” assembly and click OK
  6. Add two PictureBox controls and a TrackBar control to Form1
  7. Set the TrackBar Maximum to 27 and the Minimum to -27. These are the range values for the camera elevation angle.
  8. Add a Timer control to the Form and set the interval to 1000ms (1 second)
  9. Double click Form1 to go to Code view

Coding

Add a couple of using statements at the top of the form:

using System.Drawing.Imaging;
using Microsoft.Kinect;
using System.Runtime.InteropServices;

Define a variable to reference the Kinect sensor inside the Form class. I also added some variables to hold my sensor data:

public partial class Form1 : Form
{
    KinectSensor sensor; 

    // Depth sensor readings
    int depthStreamHeight = 0;
    int depthStreamWidth = 0;
    int depthStreamFramePixelDataLength = 0;

    // Color sensor readings
    int colorStreamHeight = 0;
    int colorStreamWidth = 0;
    int colorStreamFrameBytesPerPixel = 0;
    int colorStreamFramePixelDataLength = 0;
    ...

Set the reference to your sensor. We’ll be lazy here and just reference the first in the array. Then make sure to enable the depth stream and color stream. Here’s the code inside my form load handler:

private void Form1_Load(object sender, EventArgs e)
{
    sensor = KinectSensor.KinectSensors[0];
    sensor.DepthStream.Enable();
    sensor.ColorStream.Enable();
    sensor.DepthFrameReady += sensor_DepthFrameReady;
    sensor.ColorFrameReady += sensor_ColorFrameReady;
    sensor.Start();
}

You’ll notice that I also hooked up two event handlers here. These handlers fire when a frame is ready for rendering or otherwise processing. In our case, we’re just going to muck around with the data and dump it into the picture boxes. After we’ve set up our handlers, we go ahead and call start() on the sensor.

So now we need to create our handlers. In our handlers, we are going to:

  1. Attempt to open the frame
  2. Read the stream data for height, width, pixel length and bytes per pixel
  3. Convert the raw data to a bitmap
  4. Assign that bitmap to the picture control

Here’s my code for the sensor_DepthFrameReadyhandler:

private void sensor_DepthFrameReady(object sender, 
    DepthImageFrameReadyEventArgs e)
{
    DepthImageFrame imageFrame = e.OpenDepthImageFrame();
    if (imageFrame != null)
    {
        depthStreamHeight = sensor.DepthStream.FrameHeight;
        depthStreamWidth = sensor.DepthStream.FrameWidth;
        depthStreamFramePixelDataLength = 
            sensor.DepthStream.FramePixelDataLength;
        pictureBox2.Image = GetDepthImage(imageFrame);
    }
}

The GetDepthImage function is doing the conversion work for us. This is the code that does the conversion from the raw image frame data to a bitmap (btw, if you know an easier way to do this, please chime in. I’m not a graphics dev).

Bitmap GetDepthImage(DepthImageFrame frame)
{
    // create a buffer and copy the frame to it
    short[] pixels = new short[sensor.DepthStream.FramePixelDataLength];
    frame.CopyPixelDataTo(pixels);

    // create a bitmap as big as the stream data. Note the pixel format.
    Bitmap bmp = new Bitmap(depthStreamWidth, depthStreamHeight, 
            PixelFormat.Format16bppRgb555
        );

    // Create a bitmap data, size appropriately, and lock the data
    BitmapData bmpdata = bmp.LockBits(
            new Rectangle(0, 0, depthStreamWidth, depthStreamHeight),
            ImageLockMode.WriteOnly,bmp.PixelFormat
        );
    // Wave your magic wand and unlock the bitmap
    IntPtr ptr = bmpdata.Scan0;
    Marshal.Copy(pixels, 0, ptr, depthStreamWidth * depthStreamHeight);
    bmp.UnlockBits(bmpdata);

    // return the bitmap
    return bmp;
}

It’s important to note the pixel format in this function because, when we create a similar function for the color frame, we will use a different format. You’ll want to make sure you use the right format depending on what data you are getting.

Here’s my code for the sensor_ColorFrameReady handler:

void sensor_ColorFrameReady(object sender, ColorImageFrameReadyEventArgs e)
{
    ColorImageFrame imageFrame = e.OpenColorImageFrame();
    if (imageFrame != null)
    {
        colorStreamHeight = sensor.ColorStream.FrameHeight;
        colorStreamWidth = sensor.ColorStream.FrameWidth;
        colorStreamFramePixelDataLength = 
            sensor.ColorStream.FramePixelDataLength;
        colorStreamFrameBytesPerPixel =
            sensor.ColorStream.FrameBytesPerPixel;
        pictureBox1.Image = GetColorImage(imageFrame);
    }
}

Here’s the code for the GetColorImage function:

Bitmap GetColorImage(ColorImageFrame frame)
{
    // Create a buffer and stuff the frame pixels into it
    byte[] pixels = new byte[colorStreamFramePixelDataLength];
    frame.CopyPixelDataTo(pixels);
    
    // Create your bitmap. Notice the PixelFormat change!
    Bitmap bmp = new Bitmap(
            sensor.ColorStream.FrameWidth, colorStreamHeight,
            PixelFormat.Format32bppRgb
        );

    // Create a BitmapData objet and lock
    BitmapData bmpdata = bmp.LockBits(
            new Rectangle(0, 0, colorStreamWidth, colorStreamHeight),
            ImageLockMode.WriteOnly, bmp.PixelFormat
        );

    // Wave your magic wand again and copy the data. Notice this time
    // we multiply by the bytes per pixel? This is important to get the right
    // data size copied.
    IntPtr ptr = bmpdata.Scan0;
    Marshal.Copy(pixels, 0, ptr, 
            colorStreamWidth * colorStreamHeight * 
            colorStreamFrameBytesPerPixel
    );
    bmp.UnlockBits(bmpdata);

    // Return the bitmap
    return bmp;
}

All done well, you should now be able to run your application and get something like the following screen shot:

Kinect For Windows Sample - ScreenShot

Kinect For Windows Sample – ScreenShot

Next, we want to add some control for the elevation of the Kinect. Of course, the Kinect does have limits so it can only move so far. In this post, we’ll just move the X component of control. We will use the TrackBar control that we added to the form at the beginning of this post.

First, a little caveat. We don’t want to move the elevation of the Kinect very often. In fact, the API documentation for Kinect tells us that it is very bad to move it often as you’ll wear out the controls. For that reason, we don’t want to move the Kinect on every event received from changing the TrackBar. That would cause problems. Instead, we will update a variable when the TrackBar is changed, and use a timer that fires every second (added earlier in the project) to do the actual validation of the data and updating of the elevation.

So, add the following declarations to your form:
"]public partial class Form1 : Form
{
KinectSensor sensor;
int lastElevation = 0;
int elevation = 0;

At the very bottom of your Form_Load event tell the timer to start:

timer1.Start();

Now, create an event handler for your trackBar’s ValueChanged event as follows:

private void trackBar1_ValueChanged(object sender, EventArgs e) {
    var value = trackBar1.Value;
    var reading = sensor.AccelerometerGetCurrentReading().X;
    if (value > (sensor.MaxElevationAngle + reading)) {
        value = sensor.MaxElevationAngle;
    }
    else if (value < (sensor.MinElevationAngle + reading)) {
        value = sensor.MinElevationAngle;
    }
    elevation = value;
}

What we are doing here is first reading what the current reading is on the Accelerometer’s X component. We do this because that can have an affect on how far the sensor can move. Next, we will do some validation to make sure that the elevation angle added to the reading isn’t greater or less than the maximum or minimum values allowed (currently 27 and -27 respectively). When we change the trackBar, it updates our elevation variable. Now we need to do something with that variable.

Create a Tick event handler for the timer control you added. Add the following code:

private void timer1_Tick(object sender, EventArgs e)
{
    if (lastElevation != elevation)
    {
        sensor.ElevationAngle = elevation;
        lastElevation = elevation;
    }
}

Again, we are just doing validation to see if the last elevation is different from the current elevation. If it isn’t, then we go ahead and move the sensor and update the current position.

All this should get you to a state where you can change the sensor elevation.

There’s a lot more fun to be had, but it took me longer to write this post than it did to write the code. I suspect you can take it from here faster than you could read my post. Happy coding!

Cross-browser event hookup made easy

I seem to be on a roll. I’m coding and might as well be sharing some of what I’m working on while I do it. In that sense, here goes another small bit of code that I’ll be adding to jsSimple on github.

We all know how to hook up events cross-browser. We know that we have both attachEvent and addEventListener. Both have varying syntax and we’ve all written this code a million times. Let’s just make this simple. Here’s how to call this:

Event.add(element, 'click', callback, false);
// .. 
Event.remove(element, 'click', callback, false);

The remove looks like you’re passing around the same data, so I added a return value to “add” that allows you to capture the event and pass it in as a single object to the remove function as follows:

var evt = Event.add(element, 'click', callback, false);
// .. 
Event.remove(evt);

So, without further delay, here is the object definition:

/*!
 * jsSimple v0.0.1
 * www.jssimple.com
 *
 * Copyright (c) Tobin Titus
 * Available under the BSD and MIT licenses: www.jssimple.com/license/
 */
var EventObj = function (target, type, listener, capture) {
  return {
    'target' : target,
    'type' : type,
    'listener' : listener,
    'capture' : capture
  };
};

var Event = (function() {
  'use strict';
  function add (target, type, listener, capture) {
    capture = capture || false;
    if (target.addEventListener) {
      target.addEventListener(type, listener, capture);
    } else if (target.attachEvent) {
      target.attachEvent("on" + type, listener);
    }
    return new EventObj(target, type, listener, capture);
  }
  
  function remove(object, type, listener, capture) {
    var target;
    if (object && !type && !listener && !capture) {
      type = object.type;
      listener = object.listener;
      capture = object.capture;
      target = object.target;
    } else {
      capture = capture || false;
      target = object;
    }
    
    if (target.removeEventListener) {
      target.removeEventListener(type, listener, capture);
    } else if (target.detachEvent) {
      target.detachEvent("on" + type, listener);
    }
  }
  
  return {
    'add' : add,
    'remove' : remove
  };
}());

You can see this all in action on jsFiddle.

JavaScript animation timing made easy (requestAnimationFrame, cancelRequestAnimationFrame)

I often find myself writing a lot of the same code from project to project. One of those pieces of code is around using requestAnimationFrame and cancelRequestAnimationFrame. I wrote a quick and dirty animation object that allows me to register all of my rendering functions, start the animation and cancel it. Here’s an example of how to use this object:

function render () {
   // Do your rendering work here
}
Animation.add(render);
Animation.start();

It can also be used to add several animations before and even after Animation has started, you can add new rendering routines on the fly. This is useful in a number of instances where objects have their own render routines and you want to add rendering routines at different times.

I put in a few workarounds. The typical hack to allow setTimeout/cancelTimeout fallbacks are in there. There is also a work around to deal with the missing mozCancelRequestAnimationFrame and the fact that mozRequestAnimationFrame doesn’t return an integer per spec.

So here’s the code for the Animation object:

/*!
 * jsSimple v0.0.1
 * www.jssimple.com
 *
 * Copyright (c) Tobin Titus
 * Available under the BSD and MIT licenses: www.jssimple.com/license/
 */
var Animation = (function() {
  "use strict";
  var interval, moz, renderers = [];

// PRIVATE
  function __mozFix (val) {
    /* Mozilla fails to return interger per specification */
    if (!val) { 
      moz = true;
      val = Math.ceil(Math.random() * 10000);
    } 
    return val;
  }

  function __renderAll() {
    var r, length;

    // execute all renderers
    length = renderers.length;
    for (r = 0; r < length; ++r) {
       renderers[r]();
     }
     if (interval) {
       interval = __mozFix(window.requestAnimationFrame(__renderAll));
     }
   }
   function __registerAnimationEventHandlers() {
     var pre, prefixes = ['webkit', 'moz', 'o', 'ms'];
     // check vendor prefixes
     for (pre = prefixes.length - 1; 
          pre >= 0 && !window.requestAnimationFrame; --pre) {
      window.requestAnimationFrame = window[prefixes[pre] 
            + 'RequestAnimationFrame'];
      window.cancelAnimationFrame = window[prefixes[pre] 
            + 'CancelAnimationFrame'] 
            || window[prefixes[pre] + 'CancelRequestAnimationFrame'];
    }

    // downlevel support via setTimeout / clearTimeout
    if (!window.requestAnimationFrame) {
      window.requestAnimationFrame = function(callback) {
        // could likely be an adaptive set timeout
        return window.setTimeout(callback, 16.7);
      };
    }

    if (!window.cancelAnimationFrame) {
      window.cancelAnimationFrame = function(id) {
        clearTimeout(id);
      };
    }
  }
  __registerAnimationEventHandlers(); 

// PUBLIC
  function add(renderer) {
    if (renderer) {
      renderers.push(renderer);
    }
  }

  function isRunning() {
    return !!interval;
  }

  function start() {
    interval = __mozFix(window.requestAnimationFrame(__renderAll));
  }

  function stop() {
    if (!moz) {
      window.cancelAnimationFrame(interval);
    }
    interval = null;
  }

// OBJECT DEFINITION
  return {
    "add": add,
    "isRunning": isRunning,
    "start": start,
    "stop": stop
  };
}());

I’ve put this code on jsFiddle to test out.

I’ve also put this on github as jsSimple. I’ll likely add a few other bits of code to this as I move along.

CSS: Opacity vs Alpha (via rgba and hsla)

Once again, I was working on my new blog theme again and ran into the need to set the opacity of a background div without affecting the children. The support for opacity is spotty and slightly unpredictable. The other downside is that setting opacity via CSS affects the children of the transparent object. You can get around this by using an rgba background colors and specifying the alpha channel.

background-color: rgba(24, 117, 187, .5)

This specifies a background color of red: 24, blue: 117, green: 187 and an alpha of 50% transparency. I put up an example of this on jsFiddle here: http://jsfiddle.net/tobint/gazuB/

Here’s a side-by-side example of the differences between opacity and rgba.

Figure demonstrates opacity vs alpha

The div on the left has set an opacity of .5 on the div container. On the div on the right, I’ve set the background color with an alpha of .5 using rgba. Notice that the sample on the left has affected the transparency of the child div, but the sample on the right has not.

You can also set colors using hsla (hue, saturation, and lightness).

background-color: hsla(206, 77%, 41%, .5)

Of course, this only works in browsers released in the last few years:

  • Safari 3.1 in March 2008
  • Firefox 3 in June 2008
  • Chrome 4.0 in January 2010
  • Internet Explorer 9 in June 2011

Detecting CSS3 Transition Support

I’m in the process of developing a new blog theme for myself. I was trying to use CSS3 transitions but I wanted to fall back to JavaScript if transitions weren’t supported. I really want to avoid Modernizr if I can so I needed a quick and dirty test for detecting them. Here’s what I came up with:

var Detect = (function () { 
  function cssTransitions () { 
    var div = document.createElement("div"); 
    var p, ext, pre = ["ms", "O", "Webkit", "Moz"]; 
    for (p in pre) {
      if (div.style[ pre[p] + "Transition" ] !== undefined) {
        ext = pre[p]; 
        break; 
      } 
    } 
    delete div; 
    return ext; 
  }; 
  return { 
    "cssTransitions" : cssTransitions 
  }; 
}());

It’s simple and does the trick. Simply check the return of Detect.cssTransitions().

if (!Detect.cssTransitions()) {
   // Do JavaScript fallback here
}

You can also get the extension used in the current user-agent back from this method (ms, O, Moz, or Webkit).

Powershell: Selecting files that don’t contain specified content

I had a quick task today that required that I search a couple hundred directories and look in specific files to see if they contained a certain piece of code. All I wanted was the list of files that did not. PowerShell to the rescue!

I’ll break down each of the calls I used and provide the full command-line at the end for anyone interested.

First, we need to recurse through all the files in a specific directory. This is simple enough using Get-ChildItem.

Get-ChildItem -include [paths,and,filenames,go,here] -recurse

Next, I needed to loop through each of those files using ForEach-Object :

ForEach-Object { … }

Next, I need to get the content of each of those files. That’s done using Get-Content:

Get-Content [file]

I then need to be able to determine if the contents of the file contains the string I’m looking for. This is easy enough with Select-String:

Select-String -pattern [pattern]

That’s pretty much all the commands you need to know — we just need to put them together now.

PS> Get-ChildItem -include *.html,*.xhtml -recurse |
    ForEach-Object { if( !( select-string -pattern "pattern" -path $_.FullName) ) 
                     { $_.FullName}}

Community Question: Synching Remote Locations

I’ve been thinking about a problem that I’ve solved before. I’ve solved it a million ways but I’ve never really thought about which approach is best. I’ve decided to request some input on the subject. I’d appreciate your thoughts.

The Scenario

You’re a business with multiple locations and a single website. You want be able to allow customers to log into your site, and order something from one of your locations, but you want to give the customer immediate confirmation that their order was received by the store location — not just that the website received the order.

That means you only want to let the user know they can rest at ease knowing their order has been received by the people directly responsible for holding/delivering/shipping your product.

Application

The scenario above could describe any number of business. This could be a retail business. You may want to make sure that the store knows to hold a piece of inventory for a customer who is on their way to get it (think Best Buy’s “in store pickup”). It could also be something much more loosely connected by even legal boundaries like OpenTable does when it allows you to make reservations for a number of restaurants for open times.

Solution Approaches

There are obviously a number of ways to solve this problem and the application may very well dictate the solution you pick. There are three main approaches, and within those approaches, there are several technical ways to solve the problem.

Centralized Approach

In the OpenTable application, you could, for instance, require all reservations be made through OpenTable’s website. In that case, it means that even if someone called a restaurant, they would need to use the website.

The downside to this is what happens when the internet connection between the restaurant and OpenTable.com is interrupted. People calling the restaurant wouldn’t be able to make reservations but people on the web would. Alternatively, the restaurant and the web would be out of sync and more reservations would be made than are available.

Distributed/Brokered Approach

This approach says that each location is responsible for it’s own allocation of inventory/product/time slots. The website simply acts as a broker and sends orders to the location. This means that the website must collect the intended details and get them to the store location. There are two problems with this approach.

First, the communication from the centralized approach is still problematic. In the reservation scenario, you can’t simply store the request at the server and send it when communications return. The reservation may not be available. Ditto that with the inventory issue. If that elusive Tickle-me Elmo doll is in stock, you want the customer to be able to buy it and secure the inventory for in-store pick-up.

The second issue to determine is whether you want a push mechanism from the website to the remote location, or if you want a pull mechanism that polls for details on a regular basis. Because the inventories are disbursed, there is also some synchronization that needs to occur. You need to make sure that if you say there is an item in inventory, that there is. If it’s purchased at the store, you need the website to reflect that. If it’s purchased/reserved on the website, you need the item/reservation to be updated at the location.

Delegated Approach

There is another approach which is a bit less risky. This approach delegates a certain amount of guaranteed inventory from a remote store location to the web. This allows you to treat the web as it’s own store, handle it’s own inventory, and simply sync with the remote locations as you can. This is a problem for retail locations that do this, however, because you have to maintain two different inventory statuses — in inventory, but allocated for in-store pickup. It’s not as big of a deal for things like restaurant reservations because they aren’t “real” entities that require inventory shuffling.  There are definitely benefits to this approach, but it wouldn’t work for something like, for instance, grocery delivery.

My Solution

The solution I’m inclined toward is to use the distributed approach. When someone submits a request, it will be queued up, and an attempt will be made to submit it to the remote location, when the remote location receives the order, it will return a confirmation which will then be returned asynchronously to the user (either through polled HTTP requests or other means — Twilio, for instance). If the location cannot be reached, it will simply return an error to the user with instructions on how to contact the store directly. This is a fairly common approach.

Questions to the Community

So now that I’ve laid out my thinking, I’d like to ask some questions to you all. If you feel so inclined, please feel free to post your responses in the comments. Thanks very much in advance.

  1. Am I missing any approaches above? Is there another approach I haven’t considered?
  2. Are there any downsides that I’m missing?

I’m looking forward to hearing from you.

Taking on New Challenges: Joining the IE Team

How I Started

I’ve been into computers since I was a kid. The story is long, but I essentially started writing software in the 5th grade at North Elementary School in East Liverpool, Ohio. We had a quick introduction to computers. Our teacher discussed high-level and low-level languages and then introduced us to BASIC programming. I wrote my first program:

10PRINT “TOBY”
20GOTO 10
RUN

(Aside: For those that don’t know, I begrudgingly admit I went by “Toby” back in those days).

800xl[1]My eyes filled with wonder as my name scrolled down the screen. I immediately looked at the next instructions, and the next, and the next, and the next. My dad picked up an ATARI 800XL for the house. I spent many a full day at home working on that computer — painstakingly putting Microsoft ATARI BASIC and ATARI Assembler instructions from programming books and watching with wonder as the screen flashed exactly what I told it to do and the four voice, 3.5 octave sound screamed at me. I’ll spare you the details, but those were the beginnings of my fascination with computers. Some years later I had, for a number of reasons, stopped programming on the ATARI. When it was time to go to college, my parents got me a Packard Bell 486 DX2 66 computer. I went to college for Graphic Design – not computer science. However, when I found BASIC on the computer, I suddenly found myself hanging out with the C.S. folks more than my own classmates.

The Wonder of the Web

packardbell[1]After three semesters of college, I ran out of cash and my choice of Graphic Design over computer science made it hard for me to want to go back to college. I moved to Greenville, SC in 1994 and started playing with my Packard Bell. I mostly used it to talk on BBS’s and occasionally AOL when I could afford the time (for those of you that don’t know/remember back that far, you used to get charged by the minute for AOL use). I spent a bit of time writing small desktop applications with my copy of Visual Basic 3, patching software to get it to do what I wanted, or adding photos of myself inside my favorite games to my friends amazement. But I also started playing with HTML – something that had not yet standardized, but that I wanted to be a part of. I’ll never forget my first webpage. It had a picture of Alicia Silverstone on it – the “chick from that Aerosmith video”. The thing I liked about the web is that it combined my love for graphic design with my need for technical understanding.

I’ll again spare you the details and skip forward a few years. I was working for a consulting company called Metro Information Services as a contractor for AIMCO – at the time it was the largest property management REIT in the country. I worked on several web-based intranet applications in the 1999-2000 timeframe getting use something new called XML Data Islands, DHTML behaviors and something new called XMLHttpRequest. This allowed me to create applications that appeared more responsive and did work behind the scenes on users behalf. I fell in love with this technology with Internet Explorer and probably overused it. With just HTML and JavaScript, I felt back then that eventually most applications would become web-based with very little need for ActiveX or Java fillers. I knew that the server was still an important part too so I continued to work on enterprise middleware and database development. But I knew that the web – both server and client — was where I was meant to work.

Moving to Microsoft

Skipping forward to 2006, I had worked contract after contract, making a lot of money but starting to get bored and burned out. I was going to take a year off work and “play” with the technologies I loved most. Then Microsoft called. They had an opportunity to work with the teams that built ASP.NET and IIS. This seemed like the best opportunity so I took it. I joined as a Programming Writer for IIS. You could summarize this as simply a “documentation writer” position if you didn’t know any better. That said, I came to realize that this job required skills as both a great communicator and a great programmer. You needed to learn how to analyze API code that was written, and describe how to use it without any help. I loved my job when I first started it. However, the continued pressure to document every exposed method no matter how trivial it was also began to weigh heavily on me. I loved the web and this position seemed like the perfect position for me – till you find yourself writing documentation such as “The IAppHostSectionDefinition::Name Property Gets the name of the current configuration section definition.”

loginI had a growing desire to fix MSDN. As a developer, there were so many things that I felt I could help MSDN with, I thought I couldn’t go wrong. I loved working with the MSDN and TechNet teams. I helped redesign the home page based off of customer feedback, metrics we collected and the overall direction the company was heading. I started the MSDN News program which allowed us to aggregate content from various places inside and outside of the company and disseminate it across multiple locations. I designed and MSDN Insiders program. At every turn, however, I just felt like I was building someone else’s vision rather than making the impact I wanted to. I also, strangely enough, wasn’t getting to use the latest, greatest technology to build MSDN. I had a heavy desire to build HTML5 sites, mobile sites, and incorporate features like pinning. It’s not that I didn’t believe in what was being built, but my passions for it were not there.

Introduction to IE

UntitledI started diving into HTML5, CSS and JavaScript pretty heavily again. Inspired by the type of work that Rey Bango was doing, I wanted to reestablish my passion for the web. I began talking to people about this passion and paying more attention to what the community was saying about standards, development challenges, and of course, browsers. As I read more books I noticed that IE was rarely mentioned and if it was, it was in a bad light. Some of this was perception but some of it was reputation earned long-ago on the backs of still-lingering down-level versions of the product. I became angry when I saw a cartoon being passed around twitter. The cartoon, which many of you may have seen, was of three boys dressed in browser costumes. A Chrome-costumed boy had a Firefox-costumed boy in a headlock and they were clearly battling it out – each shouting the name of their product while holding a determined look on their face. In the corner was a baby-blue pajamad boy with a baby-blue helmet on. The helmet, of course, had an “e” on it to indicate Internet Explorer. This boy wasn’t battling at all. He was eating paste! This made me mad because I knew that the IE team was actually listening for feedback and had made considerable investment in battling back since IE6. I knew we still had our problems in IE, but certainly they didn’t deserve the “touched boy eating paste” image.

I sent a well-thought out email to the VP of IE and expressed my frustration with not only the cartoon, but the idea that we weren’t even considered a player for many people. I expected to get a pink slip for this “career-limiting email”. How often have you heard about someone telling a VP that their product needed work to be rewarded for it? Not often, in my experience. However, I was surprised to see an email come back from the VP fairly quickly. At the end of my email I asked “what can we, as employees, do to help with these problems?” The answer for this VP was pretty simple – “come and fix it.” At the VP’s request, I met with a man from IE. He listened to me and what I was passionate about and what I felt needed fixed. He asked me if I had worked with HTML5 canvas yet to which I told him I did not. He asked me to go play with it for a couple weeks or a month and let me know if I liked it and what I thought about working with it for a while. I wrote a few quick[1] demos[2] in a few days with HTML5 and shot them over to him. They weren’t great so I expected him to hate them. I hadn’t optimized my code. I wasn’t using standards. I wasn’t doing all the things someone interested in performance should do.

darkbookWe met again for coffee and he listed some of these things on the board as we chatted. At the end of the conversation he said “these could be your commitments.” Long story short, after a few more discussions I was given an offer to come join the IE performance team. I’ve got my work cut out for me. The people I met with in IE are top notch guys. They know their stuff inside and out. They know not only the code base and how it works, but how it should work. I’m told it’s going to take me about a year just to ramp up and be slightly effective. These guys have been working on the product for several years on average. I’m humbled to be able to work with them. I doubt I’ll ever be as smart as them, but I’m hoping to make my small impact on the product.

I was thankful to work with amazing people in MSDN. I’m thankful for this opportunity to work with great people again in IE. I’m excited about this move and the work ahead – something I desperately need to feel again about the work that I do. I’m excited about not only making IE better, but making the web better along the way for all of us.

My Request to Each of You

I’m going to be looking for feedback on IE. I don’t mind brutally honest feedback. If you’ve got it, I can take it. I really don’t know what work will look like in IE entirely or exactly what I’ll be able to do with most of the feedback – particularly so soon after joining the team. However, I’ll always be looking for feedback and will do my best to feed that back into the appropriate people inside the team.

Thanks for indulging me as I reminisced.

[Update] Just for clarity sake, I’m not sure how transparent I can be about what I’m doing or what the team is doing. You’ll never hear a new announcement about features or release dates or anything else coming from this blog. That’s really up to the team to communicate on official blogs. Just want to set expectations correctly.

Post Navigation