Author Archives: Admin

2017 – The Year of Motivation

In 1993, I wrote out my first business plan for a college class. I called my idea “TeleCom Television”. I drew out plans for things that didn’t exist yet: Netflix-style movies and television on demand, Amazon-style shopping, and Encyclopedia-style information at your fingertips — all accessed by Echo-style voice control to your television. I didn’t follow through on that idea at all because I thought people smarter and better than me had to build them. Back then, not only did these services not exist, we didn’t even have the infrastructure close to what was needed to support these ideas. Today, we have all of the infrastructure and these we have all of these ideas implemented — built by other people. I get to work on building a browser and influencing the internet standards that make all of this possible, but I by no means was a chief player in implementing any of my ideas.

In 2005, I had an idea for a real-time data service for traveling smarter: avoiding cops, road closures, traffic accidents, and other dangers by allowing users to provide the data real-time. In 2006 I let someone talk me out of it. In 2013, a service just as I described called Waze sold to Google for a cool $1.3 billion. I use it everyday knowing it’s pretty much exactly what I envisioned but I don’t collect a dime.

In 2006, my friends Erik Porter, Ernie Booth, and I penned a large paper together on the future of Neal Stephenson-style Virtual/Augmented reality. I thought this required a Microsoft-sized company to build a vision this large. Through Microsoft, we filed a bunch of patents together and set things in motion at Microsoft that have apparently turned out pretty well with Microsoft Kinect, XBOX LIVE Avatar Gear, Project Spark, Microsoft HoloLens and more. Microsoft is benefiting (Kinect opened as the fastest selling electronic device in history) but Erik, Ernie, and I don’t own that vision and our compensation for our ideas was mediocre at best. Worst of all, some other guy gets to own and drive that vision.

I could go on, but I won’t.

I’ve had big ideas in my life. Many of you have similar stories and I’m sure lots of regret from not following up. I’ve had enough with not following my ideas or dreams. I’ve had enough with watching others own the vision for an idea I know I could drive better. I’m tired of watching others get rich on these ideas when I could have a large piece of the pie. So in 2017, I am driving myself to higher motivation. That doesn’t mean I won’t implement and invent new ideas for my company. I’m just going to make sure that I’m in the driver seat of my own vision for where I want to be at this time next year. I’m not going to sit back and be quiet while others implement what I’ve been dreaming of for years.

My goals for the year:

  1. Automate as much of my daily life as I possibly can. I want my life on auto-pilot so that I can stay in a routine. That may sound rigid, but the truth is, the more automated your life is, the more flexibility you have. This counter-intuitive principle happens because you now have more free-time to spend on what you want and less stress worrying about the things that shouldn’t cause anyone stress.
  2. Make my job about creating. Creation for me is self-delighting so I want to do more of this. Many people say “I’m going to spend my spare time doing the things I like.” and call that “Work/Life balance.” I’m going to stop trying to “balance” work and life to allow me to work on those passions “in my spare time”. I’m going to make my job more creative and accomplishment-focused. That means I’m going to work on my passions at my job in a way that means when I’m going home, I still get to work on my passions, and that still accumulates to my job. I used to have this and I will have this again.
  3. Learn from everything/everyone. Learning isn’t just about reading. It’s about putting things into practice. In order to do this you have to stop talking and start listening to others carefully (1-on-1, books, articles, videos, etc) You have to also be able to teach others that topic and you can’t really do that until you’ve done it a good bit yourself. If you catch me being very quiet in a room, it’s not because I’m not interested. It’s because I want to learn what you know and I want to be able to do something practical with that knowledge.
  4. Iterate constantly and take value early. People that know me know that I tend to focus on putting the full picture together before I unveil. This comes from my “art” days when I didn’t want anyone to look at what I was drawing, painting, etc until I was done. You’ll see me cleaning things up to “ship” frequently and iterating more. The reason? I want to take the value early and use that value to build the next thing or second half of a project more quickly.

That’s all I got for today. I think that’s a lot considering I also haven’t blogged publicly in over a year and 4 months. 🙂
Fiddler Script for Accept-Language Testing

It’s been a while since I’ve blogged about anything so it’s only fitting that I post about doing something fairly trivial. I say it’s trivial because Fiddler makes my job so gosh-darn easy!

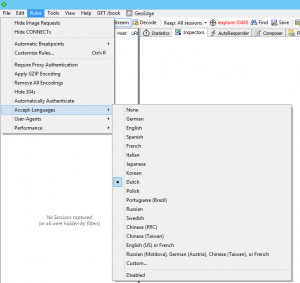
I often find myself testing that web sites work in various other languages. In many cases, changing the Accept-Language for a site will do the trick and luckily Fiddler’s custom rules will let you do the trick. The software allows you to specify Japanese as an option under the Rules menu.

That said, simply testing one language isn’t usually enough. I’d find myself hitting CTRL+R to open the CustomRules.js file, editing the Accept-Language and waiting for another day before I’d need to do this again.

I got tired of this today and completely removed the single-instance Japanese support option from Fiddler. So I replaced this code:

    // Cause Fiddler to override the Accept-Language header 
    public static RulesOption("Request &Japanese Content")
    var m_Japanese: boolean = false;

With this code:

    // Cause Fiddler to override the User-Agent header with one of the defined values
    RulesString("&Accept-Languages", true) 
    BindPref("fiddlerscript.ephemeral.AcceptLanguage")
    RulesStringValue(0,"None", "")
    RulesStringValue(1,"German", "de")
    RulesStringValue(2,"English", "en")
    RulesStringValue(3,"Spanish", "es")
    RulesStringValue(4,"French", "fr")
    RulesStringValue(5,"Italian", "it")
    RulesStringValue(6,"Japanese", "ja")
    RulesStringValue(7,"Korean", "ko")
    RulesStringValue(8,"Dutch ", "nl")
    RulesStringValue(9,"Polish", "pl")
    RulesStringValue(10,"Portuguese (Brazil)", "pt-br")
    RulesStringValue(11,"Russian", "ru")
    RulesStringValue(12,"Swedish ", "sv")
    RulesStringValue(13,"Chinese (PRC)", "zh-cn")
    RulesStringValue(14,"Chinese (Taiwan)", "zh-tw")
    RulesStringValue(15,"en-us, fr-fr", "en-us, fr-fr")
    RulesStringValue(16,"ru-mo, de-at, zh-tw, fr", "ru-mo;q=1,de-at;q=0.9,zh-tw;q=0.8,fr;q=0.6")
    RulesStringValue(17,"&Custom...", "%CUSTOM%")
    public static var sAL: String = null;

And later in the file, I replaced this code:

if (m_Japanese) {
    oSession.oRequest["Accept-Language"] = "ja";
}

with this code:

// Accept-Language Overrides
if (null != sAL) {
    oSession.oRequest["Accept-Language"] = sAL; 
}

Now every time I open Fiddler, I can just select the language I want to use.

Fiddler-Accept-Language

Kinect for Windows SDK

I read the other day that we released a new version of the Kinect for Windows SDK that is supported by Windows 8. With as busy as I’ve been working on IE10, I’ve been a bit of a slacker when it comes to trying new things so I decided that it was time to dive in and take a quick peak at what I could do with Kinect.

In a matter of a few minutes, I managed to play around a bit with the depth image sensors and the color image sensors. I also mucked around a bit with the elevation and accelerometer data. I’m not going to get fancy with this post so hang onto your hat and follow along. If you’re the one random guy that stumbles on this post and actually reads it and has questions, feel free to ask. I mean, I won’t know how to answer it, but you can always ask!

Here goes.

Purchase

There isn’t much sense in doing anything if you haven’t purchased a Kinect for Windows device already. I am very specific in stating Kinect for Windows. While there are some folks out there that provide you with the ability to use your Kinect for Xbox 360, I wouldn’t recommend it. Go get yourself one of these devices and we’ll all wait patiently till you come back.

[tapping foot]

Download/Install/Setup

Download and Install the Kinect for Windows SDK. Make sure you get the latest one from October 8th, 2012.

Plug your device into your computer and make sure to plug the power into the device. Plug and play is your friend here as there is nothing to install to make the device available.

Start Coding

Setting up your Form

  1. Open up Visual Studio 2012
  2. Go to File | New Project
  3. In the dialog, select C# | Windows | Windows Forms Application (obviously you can do this in other languages, but I’m using C# here)
  4. Right-click the References tree node in Solution Explorer and select Add Reference
  5. Press Ctrl+E, type “Kinect“, check the “Microsoft.Kinect” assembly and click OK
  6. Add two PictureBox controls and a TrackBar control to Form1
  7. Set the TrackBar Maximum to 27 and the Minimum to -27. These are the range values for the camera elevation angle.
  8. Add a Timer control to the Form and set the interval to 1000ms (1 second)
  9. Double click Form1 to go to Code view

Coding

Add a couple of using statements at the top of the form:

using System.Drawing.Imaging;
using Microsoft.Kinect;
using System.Runtime.InteropServices;

Define a variable to reference the Kinect sensor inside the Form class. I also added some variables to hold my sensor data:

public partial class Form1 : Form
{
    KinectSensor sensor; 

    // Depth sensor readings
    int depthStreamHeight = 0;
    int depthStreamWidth = 0;
    int depthStreamFramePixelDataLength = 0;

    // Color sensor readings
    int colorStreamHeight = 0;
    int colorStreamWidth = 0;
    int colorStreamFrameBytesPerPixel = 0;
    int colorStreamFramePixelDataLength = 0;
    ...

Set the reference to your sensor. We’ll be lazy here and just reference the first in the array. Then make sure to enable the depth stream and color stream. Here’s the code inside my form load handler:

private void Form1_Load(object sender, EventArgs e)
{
    sensor = KinectSensor.KinectSensors[0];
    sensor.DepthStream.Enable();
    sensor.ColorStream.Enable();
    sensor.DepthFrameReady += sensor_DepthFrameReady;
    sensor.ColorFrameReady += sensor_ColorFrameReady;
    sensor.Start();
}

You’ll notice that I also hooked up two event handlers here. These handlers fire when a frame is ready for rendering or otherwise processing. In our case, we’re just going to muck around with the data and dump it into the picture boxes. After we’ve set up our handlers, we go ahead and call start() on the sensor.

So now we need to create our handlers. In our handlers, we are going to:

  1. Attempt to open the frame
  2. Read the stream data for height, width, pixel length and bytes per pixel
  3. Convert the raw data to a bitmap
  4. Assign that bitmap to the picture control

Here’s my code for the sensor_DepthFrameReadyhandler:

private void sensor_DepthFrameReady(object sender, 
    DepthImageFrameReadyEventArgs e)
{
    DepthImageFrame imageFrame = e.OpenDepthImageFrame();
    if (imageFrame != null)
    {
        depthStreamHeight = sensor.DepthStream.FrameHeight;
        depthStreamWidth = sensor.DepthStream.FrameWidth;
        depthStreamFramePixelDataLength = 
            sensor.DepthStream.FramePixelDataLength;
        pictureBox2.Image = GetDepthImage(imageFrame);
    }
}

The GetDepthImage function is doing the conversion work for us. This is the code that does the conversion from the raw image frame data to a bitmap (btw, if you know an easier way to do this, please chime in. I’m not a graphics dev).

Bitmap GetDepthImage(DepthImageFrame frame)
{
    // create a buffer and copy the frame to it
    short[] pixels = new short[sensor.DepthStream.FramePixelDataLength];
    frame.CopyPixelDataTo(pixels);

    // create a bitmap as big as the stream data. Note the pixel format.
    Bitmap bmp = new Bitmap(depthStreamWidth, depthStreamHeight, 
            PixelFormat.Format16bppRgb555
        );

    // Create a bitmap data, size appropriately, and lock the data
    BitmapData bmpdata = bmp.LockBits(
            new Rectangle(0, 0, depthStreamWidth, depthStreamHeight),
            ImageLockMode.WriteOnly,bmp.PixelFormat
        );
    // Wave your magic wand and unlock the bitmap
    IntPtr ptr = bmpdata.Scan0;
    Marshal.Copy(pixels, 0, ptr, depthStreamWidth * depthStreamHeight);
    bmp.UnlockBits(bmpdata);

    // return the bitmap
    return bmp;
}

It’s important to note the pixel format in this function because, when we create a similar function for the color frame, we will use a different format. You’ll want to make sure you use the right format depending on what data you are getting.

Here’s my code for the sensor_ColorFrameReady handler:

void sensor_ColorFrameReady(object sender, ColorImageFrameReadyEventArgs e)
{
    ColorImageFrame imageFrame = e.OpenColorImageFrame();
    if (imageFrame != null)
    {
        colorStreamHeight = sensor.ColorStream.FrameHeight;
        colorStreamWidth = sensor.ColorStream.FrameWidth;
        colorStreamFramePixelDataLength = 
            sensor.ColorStream.FramePixelDataLength;
        colorStreamFrameBytesPerPixel =
            sensor.ColorStream.FrameBytesPerPixel;
        pictureBox1.Image = GetColorImage(imageFrame);
    }
}

Here’s the code for the GetColorImage function:

Bitmap GetColorImage(ColorImageFrame frame)
{
    // Create a buffer and stuff the frame pixels into it
    byte[] pixels = new byte[colorStreamFramePixelDataLength];
    frame.CopyPixelDataTo(pixels);
    
    // Create your bitmap. Notice the PixelFormat change!
    Bitmap bmp = new Bitmap(
            sensor.ColorStream.FrameWidth, colorStreamHeight,
            PixelFormat.Format32bppRgb
        );

    // Create a BitmapData objet and lock
    BitmapData bmpdata = bmp.LockBits(
            new Rectangle(0, 0, colorStreamWidth, colorStreamHeight),
            ImageLockMode.WriteOnly, bmp.PixelFormat
        );

    // Wave your magic wand again and copy the data. Notice this time
    // we multiply by the bytes per pixel? This is important to get the right
    // data size copied.
    IntPtr ptr = bmpdata.Scan0;
    Marshal.Copy(pixels, 0, ptr, 
            colorStreamWidth * colorStreamHeight * 
            colorStreamFrameBytesPerPixel
    );
    bmp.UnlockBits(bmpdata);

    // Return the bitmap
    return bmp;
}

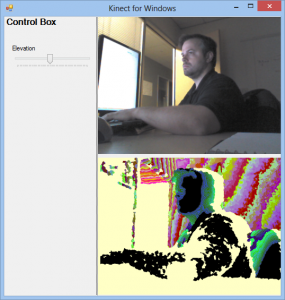
All done well, you should now be able to run your application and get something like the following screen shot:

Kinect For Windows Sample - ScreenShot

Kinect For Windows Sample – ScreenShot

Next, we want to add some control for the elevation of the Kinect. Of course, the Kinect does have limits so it can only move so far. In this post, we’ll just move the X component of control. We will use the TrackBar control that we added to the form at the beginning of this post.

First, a little caveat. We don’t want to move the elevation of the Kinect very often. In fact, the API documentation for Kinect tells us that it is very bad to move it often as you’ll wear out the controls. For that reason, we don’t want to move the Kinect on every event received from changing the TrackBar. That would cause problems. Instead, we will update a variable when the TrackBar is changed, and use a timer that fires every second (added earlier in the project) to do the actual validation of the data and updating of the elevation.

So, add the following declarations to your form:
"]public partial class Form1 : Form
{
KinectSensor sensor;
int lastElevation = 0;
int elevation = 0;

At the very bottom of your Form_Load event tell the timer to start:

timer1.Start();

Now, create an event handler for your trackBar’s ValueChanged event as follows:

private void trackBar1_ValueChanged(object sender, EventArgs e) {
    var value = trackBar1.Value;
    var reading = sensor.AccelerometerGetCurrentReading().X;
    if (value > (sensor.MaxElevationAngle + reading)) {
        value = sensor.MaxElevationAngle;
    }
    else if (value < (sensor.MinElevationAngle + reading)) {
        value = sensor.MinElevationAngle;
    }
    elevation = value;
}

What we are doing here is first reading what the current reading is on the Accelerometer’s X component. We do this because that can have an affect on how far the sensor can move. Next, we will do some validation to make sure that the elevation angle added to the reading isn’t greater or less than the maximum or minimum values allowed (currently 27 and -27 respectively). When we change the trackBar, it updates our elevation variable. Now we need to do something with that variable.

Create a Tick event handler for the timer control you added. Add the following code:

private void timer1_Tick(object sender, EventArgs e)
{
    if (lastElevation != elevation)
    {
        sensor.ElevationAngle = elevation;
        lastElevation = elevation;
    }
}

Again, we are just doing validation to see if the last elevation is different from the current elevation. If it isn’t, then we go ahead and move the sensor and update the current position.

All this should get you to a state where you can change the sensor elevation.

There’s a lot more fun to be had, but it took me longer to write this post than it did to write the code. I suspect you can take it from here faster than you could read my post. Happy coding!